How to Create a Facebook Business Page

How to Create a Facebook Business Page

Now that your business is up and running, you’re probably thinking that it may be time to kick your social media game into gear.

Guess what? We agree! Social media is a great, if not vital tool for turning your business into an accessible brand.

Seeing as Facebook alone has over 2 billion users (read: potential customers), creating a Facebook business page is the perfect way to both give your audience a place to interact with your brand and turn regular customers into loyal fans.

So, if you’re ready to gain exposure for your business and expand your customer base – let’s get to it!

Five Steps to Creating a Facebook Business Page

Step 1. Sign up.

To create a Facebook business page, you need to have a personal Facebook account.

If you don’t have one, you can set up your account with a login email and password here.  

Step 2. Create Page.

There are two ways to make this happen.

One option is to go to this link: Facebook.com/business. A window looking like this will open:  
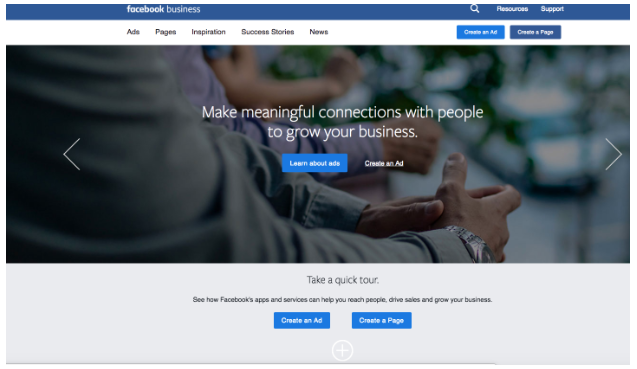
From here, click “Create a Page.”  

Or, you can log in to your personal Facebook account. On your home page, click on the “Create” button that’s next to “Home.” 
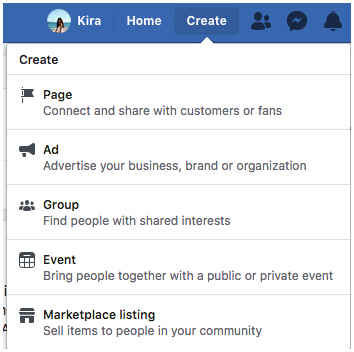
Then, select “Page.”

Regardless of how you went about creating your page, the next window that will open should look like this:
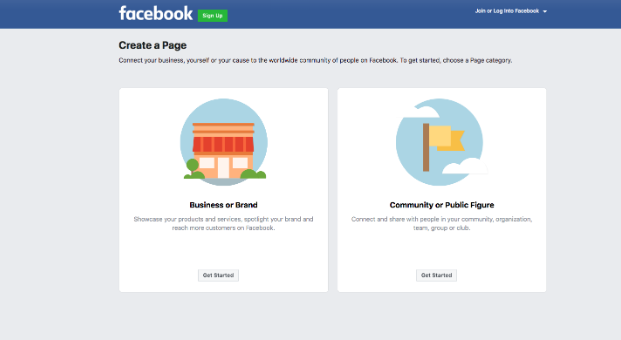
Step 3. Decide which kind of page is best suited for your needs.

  • Business or Brand: Select this option to build your brand, showcase your business, and gain Facebook followers as you grow.
  • Community or Public Figure: This type of page is for connecting with others who share interests similar to yours – for instance, members of the same organization or club, or fans of a specific celebrity.  

Most businesses are better off choosing the first option, unless your company is a conversation-based enterprise dedicated to tea drinkers who meet bi-weekly to discuss the World Cup.

That business should have a “Community” page, all the way.

Step 4. Name your page.

Once you click on ”Business or Brand,” the following window will open:
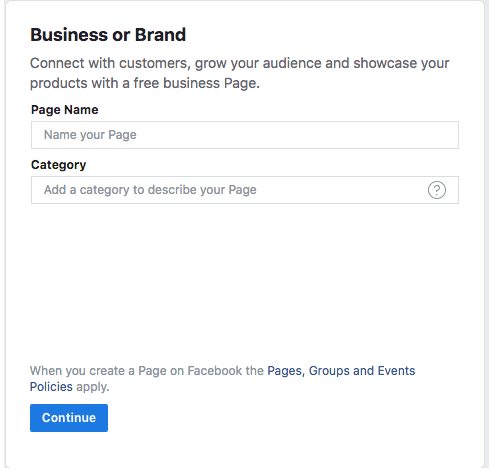
Name your page here. Make sure to use the exact name of your business, so that people can easily find your page when searching.

Then, add a category.

When you type a keyword into the bar under “Category,” a list of category possibilities will appear. It’s okay if your business falls into more than one category; select one or two options that you feel help clarify the niche that your business occupies.

Don’t worry about getting this exactly “right” – you can always go back and change your categories later.  

As an example, we’ve created a Facebook business page for a local artisanal coffee shop called Karen’s Coffee LTD.   
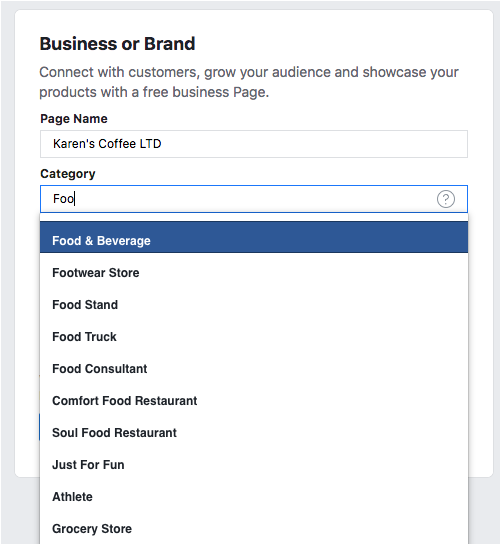
As Karen’s is a cafe, we typed “food” into the Category search bar and selected “Food & Beverage.”

Once you have selected your categories, click “Continue.”

Step 5. Add Images.
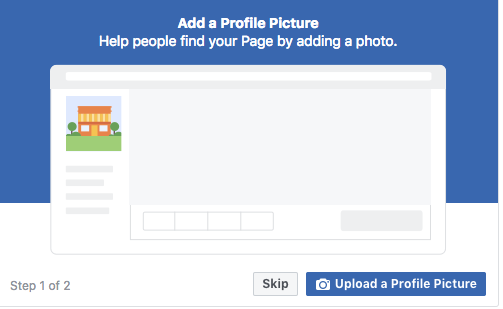
The above window will open.

Anyone who comes to your Facebook page will directly associate your profile picture with your business, so make sure to choose an image that accurately represents your brand. We recommend uploading your company logo, or using an image of a memorable product you offer that your customers love.

Note: Your profile picture appears as a square on your business page (on the top left-hand corner), but it will be cropped into a circle when you post or use Facebook ads. In light of this, try to use a picture that draws attention to the center of the image rather than the corners.

The dimensions of your profile picture will change based on the device the viewer is using:

  • 170 by 170 pixels on computers
  • 128 by 128 on smartphones
  • 36 by 36 on feature phones

To add a profile picture to your Facebook page, click “Upload a Profile Picture.”

If you haven’t yet decided on a profile picture that you like, you can choose to “Skip” this section – but make sure you come back to it later!  
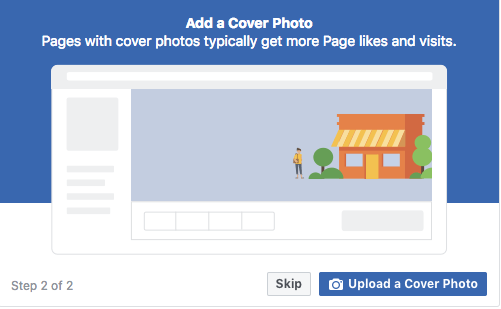
Next, add a cover photo.

Your cover photo will be the first thing that catches people’s eyes when they come to your page, so put some thought into picking a photo that’s both high-quality and aesthetically pleasing. The image should be able to show off your personality to your audience, while also reminding them of what your business does.

Our hypothetical cafe is most well-known for their – can you guess? – coffee, so we chose a cover photo of the locally grown, fresh coffee beans we use to keep our foodies happy.
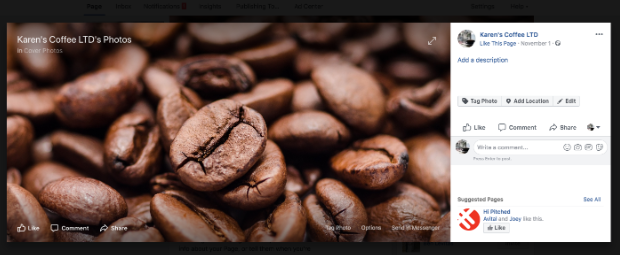
As with your profile picture, the dimensions of your cover photo will alternate:

  • 851 pixels wide by 312 pixels tall on computers
  • 640 pixels wide by 360 pixels tall on smartphones

Ideal cover photo size: 851 pixels wide by 315 pixels tall

Required cover photo size: At least 400 pixels wide and 150 pixels tall

Once you’ve chosen your photo, click “Upload a Cover Photo.”
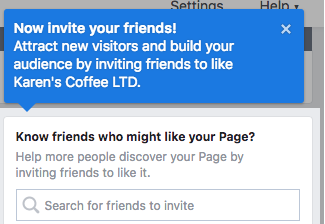
That’s it! You have successfully created a Facebook business page.

You may see the above window pop up on the bottom left-hand side of your screen, encouraging you to invite your friends to “like” your page. However, we advise holding off on publicizing your Facebook page until you optimize your page for engagement, which leads us to….

Tips for Optimizing Your Facebook Business Page

Now that your Facebook business page is set up, you’ll want it to be in tip-top shape before showing it to your fans.

Manage your photos. First, go back and add your cover photo and profile picture if you haven’t already. You can do this by clicking on the camera icon in the bottom right corner of the profile picture square or the top left corner of the cover photo rectangle.
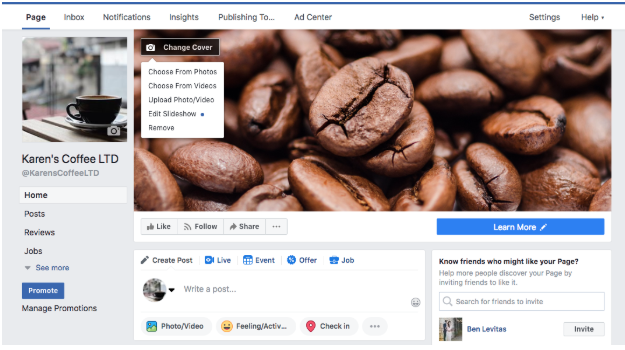
Note: You can now upload multimedia to your cover banner, such as a video or a slideshow. Just click on “Upload Video” or “Edit Slideshow” from the “Change Cover” dropdown menu to add media.

Create an About section. You want your customers to know that they can come to your Facebook page and get most (if not all) of their questions answered – so the more information you have on your Facebook page, the better! You can update your About section by going to the left side of your page and clicking “About.”

Alternatively, click on the three dots next to the “Share” option under your cover photo, and then select “Edit Page Info.”  
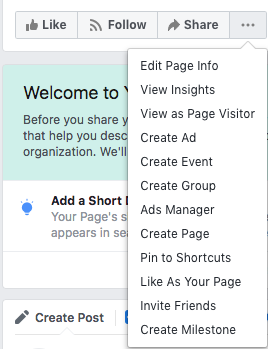
Your page info is split into five sections: General, Contact, Location, Hours, and More.
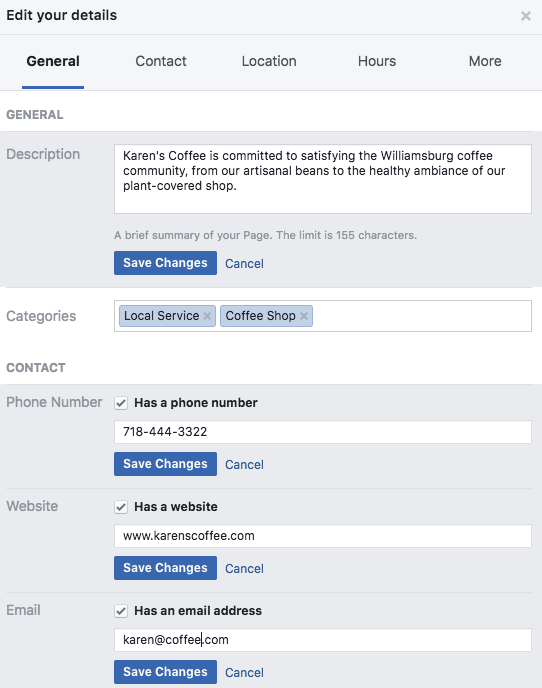
It’s up to you to decide which information you can potentially provide that will be relevant to your customer base (and which information you could probably leave out).

If you’re a local business, you should definitely fill out the Location and Hours sections so your customers can easily get to your store. An ecommerce website, on the other hand, may not have a physical location but would do well to list some of their best-selling products within the More section.

And, we recommend that every business provide basic contact information and leave your customers with a convenient way to reach you – adding a website, for one, is a great way to ultimately turn an interested audience into one that converts.

Add a short description. Limited to 155 characters, the description of your business should be short and sweet. Tell everyone exactly what they need to know without giving too much detail. (You can fill out this description under the General section of your About page).  

Create a button. This will be a subtle call to action, encouraging your viewers to do something like “Learn More” or “Go to Website.”

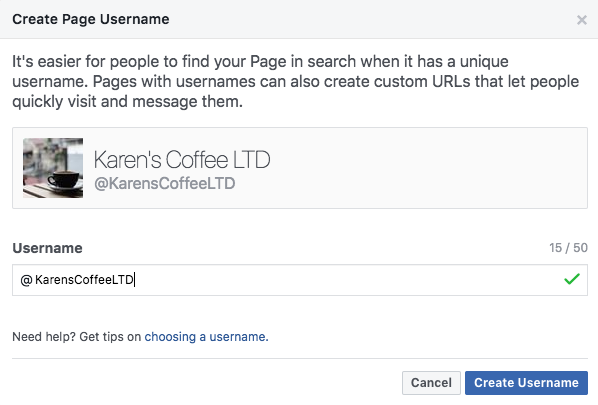
Create a username for your page. Your username will be the end of your Facebook page’s URL, and it will help people find your Facebook business page when searching.

This should be a name that’s unique, but not difficult to remember – the more specific you get, the easier it will be for potential customers to find your page. Of course, the best option would be to create a username that’s as close to the name of your business as possible!

Once you create a username, it will be listed as @username. For example, @KarenscoffeeLTD is the username of our Facebook business page.
Post interesting content. People who visit your page will expect to see some valuable content, so don’t disappoint! You can add a blog post, a photo, or even an inspirational quote that you feel your audience will enjoy. (For more information regarding adding content to your Facebook business page, see our blog post on How to Create a Social Media Content Plan.)

Like your page. Use your personal Facebook account to give your page its first “like” – simply click the “Like” button under your cover photo.

Invite friends to like your page. Now that your Facebook page is all set up, you’re ready to be noticed! On the right hand side of your page, you’ll see a search bar that says “Search for friends to invite.” Type in the names of any of your Facebook friends who you think will enjoy your page and click the “Invite” button next to their names.

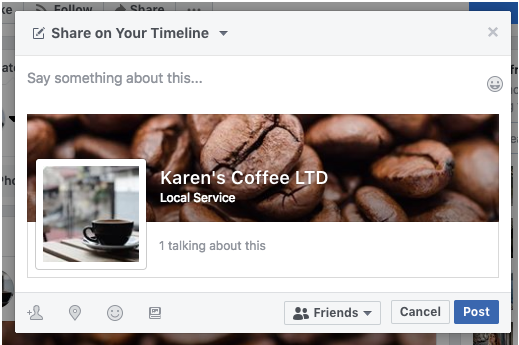
Share your page to your Timeline. If you want to spread the word about your business, posting your Facebook business page to your personal Timeline is an easy way to start. Click the “Share” button under your cover photo and write a caption about your new page. When you’re done, click “Post.”
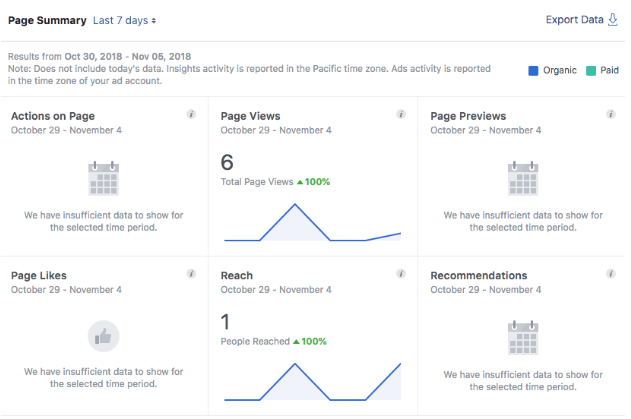
Insights. Once your Facebook page is in action, it’s important to know if your audience is engaged. Luckily, your “Insights” tab provides you with the analytics that give you a sense of how well your page is performing in real time.  

To see these insights, click on the three dots underneath your cover photo (next to the “Share” button).

Then, click “View Insights,” and you’ll see a number of measures regarding your Facebook business page displayed.
From here on out – it’s your turn!

Now that your Facebook business page has been created and optimized, read all about creating an effective social media marketing strategy.

Wondering how you’re going to find the time to manage your social media page? Don’t worry – Tailor Social has you covered! Start scheduling your posts here, and we’ll do the rest.

Ready To Start?

Simply Start Your Trial Now to explore all Tailor Social features for free.

How to Create a Social Media Content Plan

How to Create a Social Media Content Plan

If you’re a small business or startup owner, you’ve likely heard the benefits of using social media marketing.  

However, it can be difficult to know where to begin with your own social media marketing campaign – or how to continue. You constantly have to ask yourself:

  • How do I execute an effective social media marketing strategy?
  • What kind of content should I post?
  • What if I have other, more pressing priorities – can I ignore social media and hope it goes away?
  • How do I really know my strategy is working?

The solution: Create a social media content plan – that works.  

If social media were a pizza, content would be the dough. It’s the foundation on which your social strategy is based, and the tool through which you’ll humanize your brand to your customers.

BUT –

Posting random content and hoping that it resonates with your audience is like shooting a basketball with a blindfold on.

If your customer base consists of baby boomers seeking industrial-sized washing machines, they probably won’t find your Kardashian memes particularly endearing.

Luckily, having a content plan in place ensures that the information you share is valuable to your readers – keeping your audience engaged, loyal, and growing on the daily.   

Read on for more details on how to create an overarching content plan without losing your hair…or mind.

1. Know Your Audience and Set Goals

Anyone can share content on their social media pages – the hard part is sharing content that resonates with your readership.

To get this right, you need to understand your audience as well as you do your own business.

Let’s say you’ve done preliminary research. You know who your customers are, what they like and how they behave. This means you’ve pinned down your audience’s:

  • Pain points– The problems your customers are looking to solve
  • Demographics– Their ages, general locations, employment and income level
  • Preferred social network- Where they are most likely to follow your brand

If this sounds like you, go on to Step 2.

But, maybe you have yet to define your customer persona.  

There are a myriad of tools to help you gain insights into your customers’ behaviors – including on social media!

Market research using social media

Facebook offers lots of great demographic information, organized by user action.

For example, you can see the ages, genders, and countries of users who have clicked an “Action” button on your page.

Social Media Analytics - Tailor Social

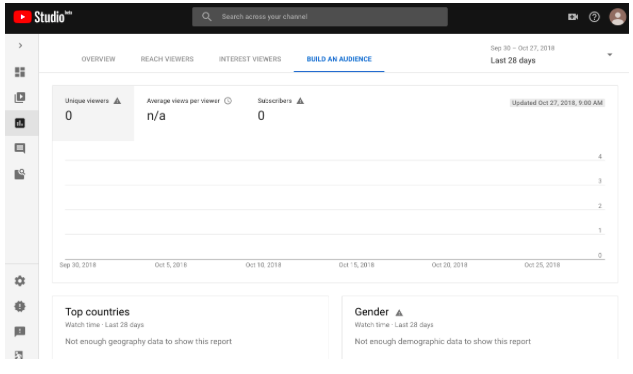
YouTube provides the ages, genders and locations of your video viewers, in addition to the video Retention Rate (average watch time per video).

Screen shot of Youtube analytics

What’s especially helpful about YouTube is that it allows you to pinpoint the moment your viewers stop watching your videos.

Tip: You can use this info to optimize the length of your videos, and make sure to get that call to action in before your viewers are ready to move on.   

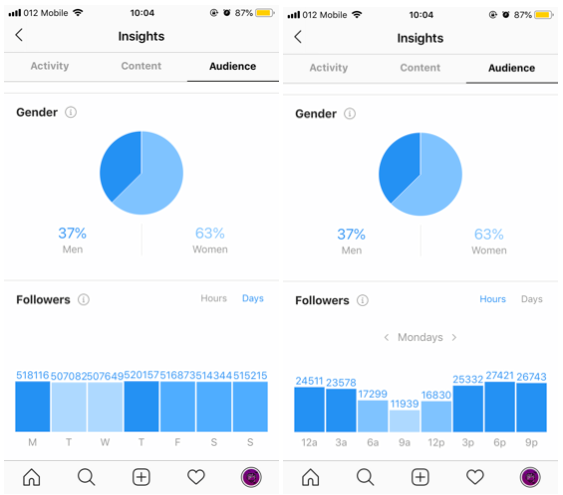
Instagram Insights give demographic information similar to Facebook and YouTube, but they also disclose the specific hours and days on which your followers are the most Insta-active.

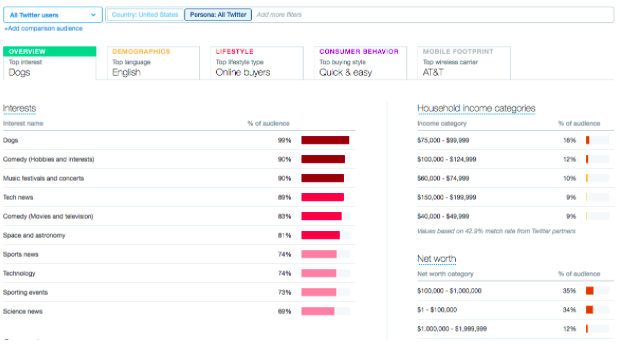
Twitter’s “Audience insights” dashboard shows you statistics about your followers, including their interests, occupations, lifestyle choices and even consumer buying styles.

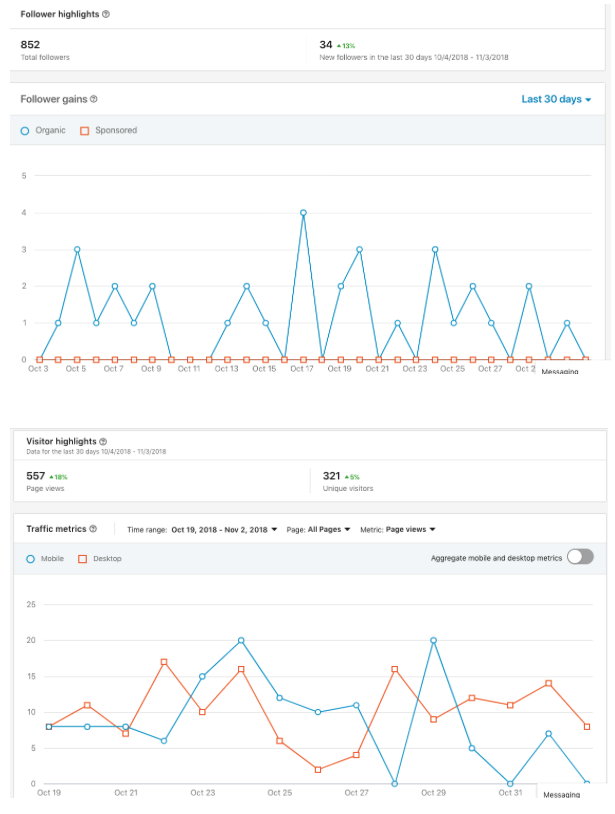
LinkedIn offers the professional demographics of visitors to your Company Page, like their job titles, industry, company size, etc.

Twitter Audience insight dashboard

In addition to social media, there are a number of (free!) tools out there to help you determine your buying persona.

Some of our favorites:

Google TrendsLearn what the cool kids are doing by researching trends. You can search for popular subjects according to your niche, or monitor the searches that are currently trending across Google.

Social Mention – This analyzes over 100 social media networks in real time. You can explore and track any topic (including your company name) through its mentions and traction across the social media board.

US Census Data Tools – Use these tools to gain an idea of your potential reach – that is, how many people you can reasonably expect to be interested in what you have to offer.  

Statista – It’s all about the numbers. You can find a bunch of statistics on over 600 industries, with graphs that make the information easily digestible.

Once you know which population(s) you want to target, define your specific objectives:

– Are you trying to bring new leads to your website and feed your email list?

– Do you want to increase brand awareness overall?

– Are you after retaining the happy followers you already have?

– Maybe you want feedback from customers and to use social media for communication?

– Is the goal to hyper-focus on targeting new customers?

Make sure you define your goals for your social media content plan in concrete terms.

“Grow a community” may sound nice in theory, but there’s no objective way to calculate success. However, “Increase my Twitter following by 350 people this month” is specific – and measurable.

2. Choose the Right Social Networks

Think of this stage as an extension of your market research.

To maximize the number of followers who will see your content, you’ll want to:

Assess your social standing.

  • Which social networks has your company used?
  • What kind of response do you get from each one?
  • Is your Facebook page optimized with a cover photo and username?
  • How many retweets do you get on an average Twitter post?

Analyze the market.

  • Where are your competitors posting?
  • What kind of content do they post?
  • Is the audience digging it?
  • Where are the gaps? (Meaning, which existing content holes can you fill?)
  • Where are your target customers hanging out?

When choosing the social media spaces through which to implement your content plan, bear in mind that each platform has its own personality along with individual strengths and weaknesses.  

Don’t sweat it – the research on this has already been done for you.

For a comprehensive breakdown of each social channel’s typical audience, including number of users, age, gender and more, check out this post from Social Media Examiner and Pew Research.

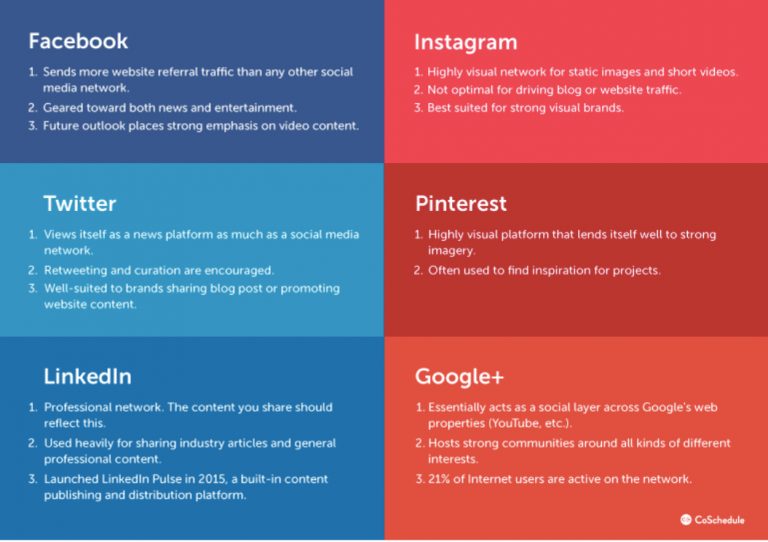
Below is a great overview of some of the main social media players.  

(Although it’s not listed here, you may also want to consider using Youtube to your advantage as there are over thirty million active Youtube users per day.)

Source: CoSchedule

What does this info mean for your content plan?

  • If you’re driving leads to your website, skip Instagram.
  • If you’ve released a new video, go with Facebook (or YouTube).
  • If you want to share industry news with your followers, LinkedIn makes the most sense.

(Pinterest likely isn’t the forum for your “What Kind of Potato Are You This Holiday Season” Buzzfeed quiz, but your Snapchat audience would eat it up.)  

For more specific info on each of the big social media platforms, check out this Pew Research post.  

Reciprocity on Social Media - Chart
Source: Pew Research Center

Consider Social Network Reciprocity

That’s a fancy way of saying that your target customer could be on several social platforms at once.

Spoiler alert: They are.

In general, there’s no one-size-fits-all to where your audience lives (though note that an average of 92% of all social media users are also on Facebook).

Above all, remember to implement your social media content plan on platforms that your target audience responds well to.

3. Strategize

Time for your content plan to take shape.

“Shouldn’t I be posting about my business all the time?” is a question we hear often.

Put it this way – no one likes going to a party and getting cornered by the budding entrepreneur who talks your ear off about his million-dollar idea THE. WHOLE. NIGHT.

Don’t be that guy.

The content in your plan should be relevant to your industry – but not all of it should be about you.  

Luckily, there are a number of strategies for determining the amount and kinds of content to share on social media.  

The first option? Just ask your followers.

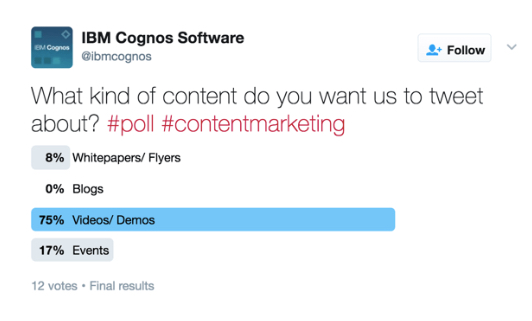
You can create a Twitter or Facebook poll and ask your customers how they prefer to see their content.

By knowing what your audience wants and giving it to them, you’re more likely to get positive feedback in the form of retweets, likes and shares.

Ask them what kind of content they want to consume through a Twitter or Facebook poll. By knowing what your audience wants and giving it to them, you’re more likely to get more positive feedback in the form of retweets, likes and shares.

Twitter - IBM Poll

Best content for social media

There is no end to the different types of content you can publish on your social channels: 

  • Blog posts 
  • eBooks 
  • Infographics 
  • Tips 
  • Quotes
  • Personal Content – Behind-the-scenes 
  • Videos
  • Company and product announcements 
  • Events 
  • Curated content 
  • Case Studies
  • User Generated Content – Customer testimonials and stories 
  • Webinars
  • Live Streams
  • Podcasts 

Remember, content isn’t just text. You can post gifs, illustrated quotes and fun photos – anything that will keep your audience engaged.

Tip: For original visuals, modify your own pics with GIMP – a free open-source image editor.

Others might include things like How To’s, List Posts, and quizzes in their repertoire – the possibilities are nearly endless. As you can see, good content isn’t just about being a witty wordsmith; post Gifs, illustrated quotes and fun photos to keep things dynamic.

Option two: Follow a social media content ratio.

Your content ratio is just a rule that you apply to balance the kinds of content you share on your social media pages.

Benefits of using a content ratio:

  • Your posts will be consistent, which makes it easy to plan out your content for the coming weeks, months, or year.
  • It ensures your content is varied and relevant.
  • You won’t overwhelm your followers with “too much” of any one kind of post.

Office Hacks by Inkjet lays out a few of the tried-and-true content sharing ratios out there. The highlights:

5:3:2

This ratio focuses on the source of content:

  • 5 pieces of curated content from others
  • 3 pieces of content from you
  • 2 pieces of personal content from you

4:1:1

Stick to this to strike a balance between self-promotion and using content to connect with your audience:

  • 4 pieces of original, new content
  • 1 repost (content that has been shared by someone else in the industry)
  • 1 piece of promotional content

5:5:5+

Do you believe that all content has been created equal? If yes – try this:

  • 5 pieces of content from you
  • 5 pieces of content from others in the industry
  • 5 responses/replies to posts you’ve already shared
  • + posts that you think your customers would enjoy. Get creative!

30/60/10

Rallyverse claims this as the “Golden Ratio” of content sharing:

  • 30% content that you’ve created
  • 60% content that you’ve curated from other sources
  • 10% promotional content that has a call to action

4:1

This categorizes content by type:

  • 4 pieces of the “main” kind of content your audience responds to (blog posts, images, etc.)
  • 1 piece of content that differs from your primary content

Hootsuite adds another method to the mix: The Rule of Thirds

  • ⅓ of your content is promotional and should generate conversions
  • ⅓ of your content is shared from other companies in the industry
  • ⅓ of your content is personal and focuses on humanizing your brand

Choose the ratio that works for you and your social needs. Of course, you can always switch it up if you see that some kinds of content resonate more with your audience than others.

Remember, consistency is key for your social media content plan to be successful. Find what works for you – and stick to it.

Play Video

4. Make a Social Media calendar

Getting this amount of content across various social media channels may seem daunting.

It certainly can be – unless you have a content calendar.  

Why you need a content calendar

Stay organized. A calendar is the easiest way to organize your social media content plan.

Be consistent. Your calendar ensures consistency, which your followers will learn to rely on. If your content is relevant and engaging, your audience is going to routinely check your pages for new posts – so you better deliver!

Save time and resources by planning ahead. You don’t want to scramble every other day to find the perfect post.

Take advantage of holidays and special dates. On social media, (almost) every day is a holiday! Don’t miss the opportunity of getting creative on #NationalPizzaDay or #OppositeDay (and, of course, regular holidays like Halloween or Thanksgiving). If it’s whacky and trending, chances are your followers want to see a post about it – putting it on the calendar ensures that this happens.

Strategize around company events. Do you have a new product launch in March or an annual event every winter? Planning in advance gives you enough time to generate hype and get everyone on board.

Find what works. Refer back to your calendar whenever engagement seems especially high or low to check if there’s a content pattern responsible.

It may be time-consuming to create initially, but think of your content calendar as a one-time investment with a never-ending ROI.  

Best frequency for posting to social media

Once again, the research speaks for itself.

Here’s what 23 Studies Say About The Best Times To Post on social media platforms.

To sum up: Each social media network has an ideal day and time for posting, depending on the industry.

For example, mid-morning works best for healthcare companies posting on Facebook, while B2C businesses would do better posting on Twitter in the early morning or later evening.

Plan your posting schedule strategically for more followers, traffic, and to ultimately increase engagement.

Tools for creating a content calendar

You know what you’re posting and when you’re posting it – now you just have to get it on virtual paper.

To keep it simple, use a spreadsheet. If you want free, ready-made templates in Excel for calendaring, auditing or reporting, check out SmartSheet.

Or, choose an app.

Four top social media management and scheduling tools for 2018 are:

  • Tailor Social – For well-designed, automated posts and optimized scheduling.
  • Buffer-Great if you’re getting your feet wet.
  • Sprout Social– Has an all-in-one platform so you don’t have to bounce between social networks, analytics and reports.
  • CoSchedule– Integrates with blogs and gives reports on social shares and engagement.

As you fill up your content calendar, make sure to include the:

  • Post title
  • Type of content
  • Expected author
  • Due date
  • Objective
  • Keywords
  • Status
  • Link

When you finish, it’s time to start posting to your social media channels!

5. Evaluate the Social Data

You’ve done the hard part – now you just need to measure your progress.

Assessing your performance is key to gauging how well your content strategy is (or isn’t) working.

Analytics are your friend.

Maybe you’re posting the right types of content but on the wrong days of the week, or maybe your audience responds better to infographics than long-form articles. You can use KPIs as the tool to help you decide how to proceed and keep those conversions coming.

Like you saw in Step 1, the social media networks you’re using provide helpful insights into your audience’s engagement with your content.

For example:

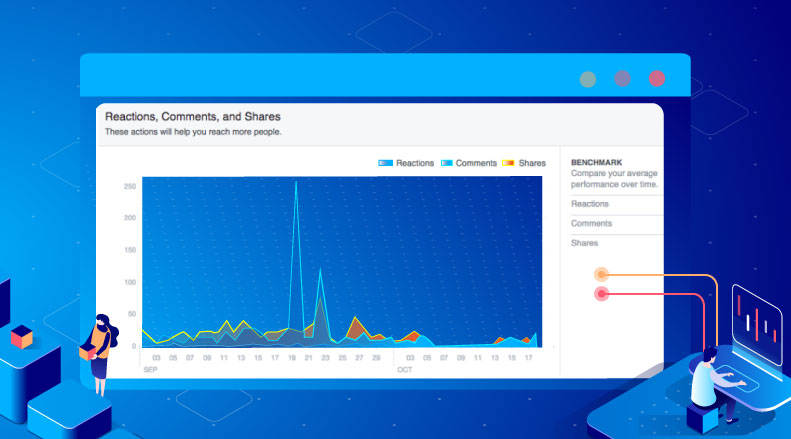
The Facebook graph above shows reach in terms of overall post likes, comments, and shares.

Reach = the total number of views your post got from user feeds.

If these metrics increase, you’re reaching more people organically.

Hum by Verison - Video

For example: This Hum Rider video reached 35 million viewers on Facebook in less than 48 hours. Unmetric scored this post at 1,000—considered to be the most engaging of the year.

  • Engagement – Unique people who have interacted with your posts. This is measured by clicks, retweets, likes, shares and comments; the higher the number, the more engaged.
  • Referral traffic – Google’s way of reporting visits to your site from outside sources. Referral traffic back to your site is usually seen before conversions.
  • Conversions – People who responded to your call to action and made a purchase.

Assess the effectiveness of your social media content plan

  • Is social media engagement leading to sales? If not, you’ll need to adjust, test, and monitor your overall content plan.
  • Use analytics to get to know your audience better and give them more of what they love.
  • Track each post’s performance, and refer back to your content calendar to see where you’re most successful and how to optimize your content plan for your audience.

Note: Tailor Social can be a helpful tool if you want a simplified but comprehensive report of your social media campaign metrics.

Now it's Your Turn

Do you have a social media content plan for your startup or small business? What actions did you take that generated good results?

Share on facebook
Facebook
Share on google
Google+
Share on twitter
Twitter
Share on linkedin
LinkedIn

Ready To Start?

Simply Start Your Trial Now to explore all Tailor Social features for free.