How to Create a Facebook Business Page

Now that your business is up and running, you’re probably thinking that it may be time to kick your social media game into gear.

Guess what? We agree! Social media is a great, if not vital tool for turning your business into an accessible brand.

Seeing as Facebook alone has over 2 billion users (read: potential customers), creating a Facebook business page is the perfect way to both give your audience a place to interact with your brand and turn regular customers into loyal fans.

So, if you’re ready to gain exposure for your business and expand your customer base – let’s get to it!

Five Steps to Creating a Facebook Business Page

Step 1. Sign up.

To create a Facebook business page, you need to have a personal Facebook account.

If you don’t have one, you can set up your account with a login email and password here.  

Step 2. Create Page.

There are two ways to make this happen.

One option is to go to this link: Facebook.com/business. A window looking like this will open:  

From here, click “Create a Page.”  

Or, you can log in to your personal Facebook account. On your home page, click on the “Create” button that’s next to “Home.” 

Then, select “Page.”

Regardless of how you went about creating your page, the next window that will open should look like this:

Step 3. Decide which kind of page is best suited for your needs.

  • Business or Brand: Select this option to build your brand, showcase your business, and gain Facebook followers as you grow.
  • Community or Public Figure: This type of page is for connecting with others who share interests similar to yours – for instance, members of the same organization or club, or fans of a specific celebrity.  

Most businesses are better off choosing the first option, unless your company is a conversation-based enterprise dedicated to tea drinkers who meet bi-weekly to discuss the World Cup.

That business should have a “Community” page, all the way.

Step 4. Name your page.

Once you click on ”Business or Brand,” the following window will open:

Name your page here. Make sure to use the exact name of your business, so that people can easily find your page when searching.

Then, add a category.

When you type a keyword into the bar under “Category,” a list of category possibilities will appear. It’s okay if your business falls into more than one category; select one or two options that you feel help clarify the niche that your business occupies.

Don’t worry about getting this exactly “right” – you can always go back and change your categories later.  

As an example, we’ve created a Facebook business page for a local artisanal coffee shop called Karen’s Coffee LTD.   

As Karen’s is a cafe, we typed “food” into the Category search bar and selected “Food & Beverage.”

Once you have selected your categories, click “Continue.”

Step 5. Add Images.

The above window will open.

Anyone who comes to your Facebook page will directly associate your profile picture with your business, so make sure to choose an image that accurately represents your brand. We recommend uploading your company logo, or using an image of a memorable product you offer that your customers love.

Note: Your profile picture appears as a square on your business page (on the top left-hand corner), but it will be cropped into a circle when you post or use Facebook ads. In light of this, try to use a picture that draws attention to the center of the image rather than the corners.

The dimensions of your profile picture will change based on the device the viewer is using:

  • 170 by 170 pixels on computers
  • 128 by 128 on smartphones
  • 36 by 36 on feature phones

To add a profile picture to your Facebook page, click “Upload a Profile Picture.”

If you haven’t yet decided on a profile picture that you like, you can choose to “Skip” this section – but make sure you come back to it later!  

Next, add a cover photo.

Your cover photo will be the first thing that catches people’s eyes when they come to your page, so put some thought into picking a photo that’s both high-quality and aesthetically pleasing. The image should be able to show off your personality to your audience, while also reminding them of what your business does.

Our hypothetical cafe is most well-known for their – can you guess? – coffee, so we chose a cover photo of the locally grown, fresh coffee beans we use to keep our foodies happy.

As with your profile picture, the dimensions of your cover photo will alternate:

  • 851 pixels wide by 312 pixels tall on computers
  • 640 pixels wide by 360 pixels tall on smartphones

Ideal cover photo size: 851 pixels wide by 315 pixels tall

Required cover photo size: At least 400 pixels wide and 150 pixels tall

Once you’ve chosen your photo, click “Upload a Cover Photo.”

That’s it! You have successfully created a Facebook business page.

You may see the above window pop up on the bottom left-hand side of your screen, encouraging you to invite your friends to “like” your page. However, we advise holding off on publicizing your Facebook page until you optimize your page for engagement, which leads us to….

Tips for Optimizing Your Facebook Business Page

Now that your Facebook business page is set up, you’ll want it to be in tip-top shape before showing it to your fans.

Manage your photos. First, go back and add your cover photo and profile picture if you haven’t already. You can do this by clicking on the camera icon in the bottom right corner of the profile picture square or the top left corner of the cover photo rectangle.

Note: You can now upload multimedia to your cover banner, such as a video or a slideshow. Just click on “Upload Video” or “Edit Slideshow” from the “Change Cover” dropdown menu to add media.

Create an About section. You want your customers to know that they can come to your Facebook page and get most (if not all) of their questions answered – so the more information you have on your Facebook page, the better! You can update your About section by going to the left side of your page and clicking “About.”

Alternatively, click on the three dots next to the “Share” option under your cover photo, and then select “Edit Page Info.”  

Your page info is split into five sections: General, Contact, Location, Hours, and More.

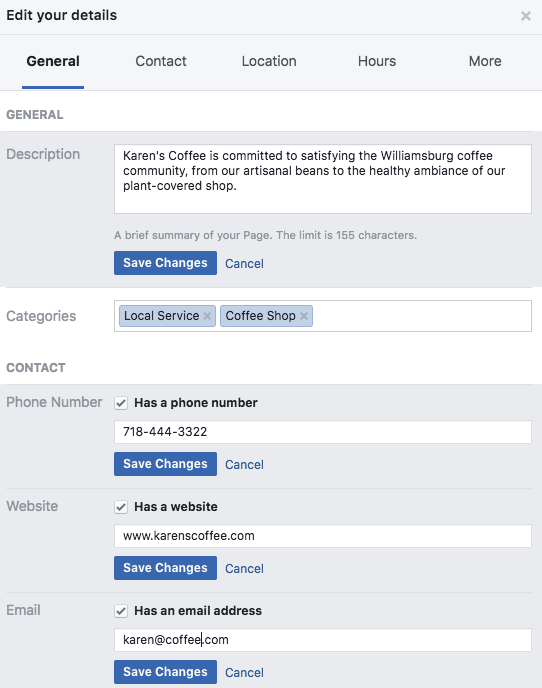
It’s up to you to decide which information you can potentially provide that will be relevant to your customer base (and which information you could probably leave out).

If you’re a local business, you should definitely fill out the Location and Hours sections so your customers can easily get to your store. An ecommerce website, on the other hand, may not have a physical location but would do well to list some of their best-selling products within the More section.

And, we recommend that every business provide basic contact information and leave your customers with a convenient way to reach you – adding a website, for one, is a great way to ultimately turn an interested audience into one that converts.

Add a short description. Limited to 155 characters, the description of your business should be short and sweet. Tell everyone exactly what they need to know without giving too much detail. (You can fill out this description under the General section of your About page).  

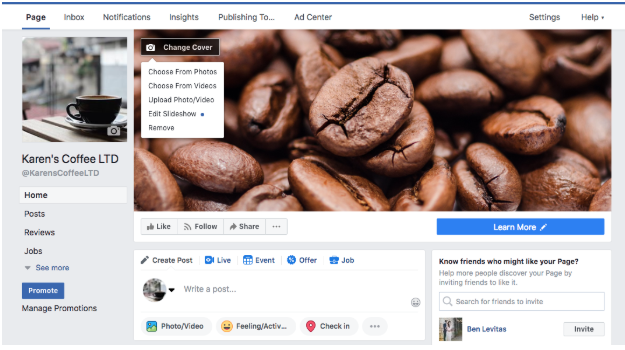
Create a button. This will be a subtle call to action, encouraging your viewers to do something like “Learn More” or “Go to Website.”

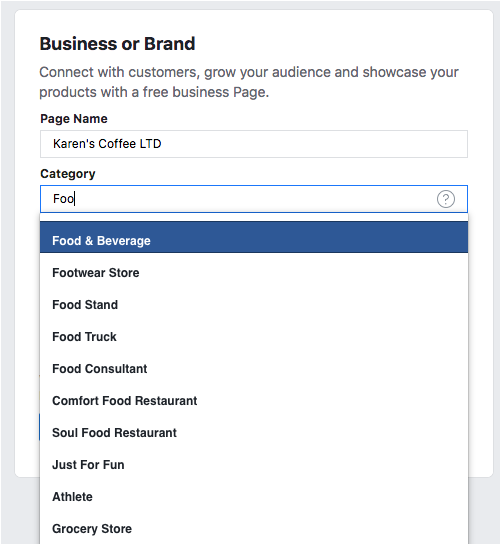
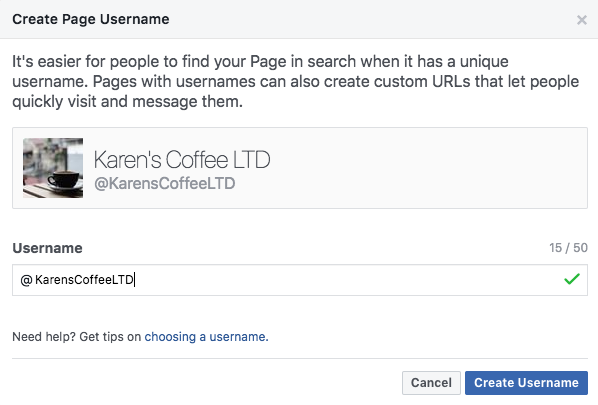
Create a username for your page. Your username will be the end of your Facebook page’s URL, and it will help people find your Facebook business page when searching.

This should be a name that’s unique, but not difficult to remember – the more specific you get, the easier it will be for potential customers to find your page. Of course, the best option would be to create a username that’s as close to the name of your business as possible!

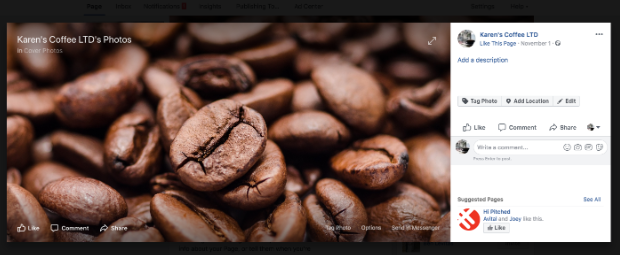
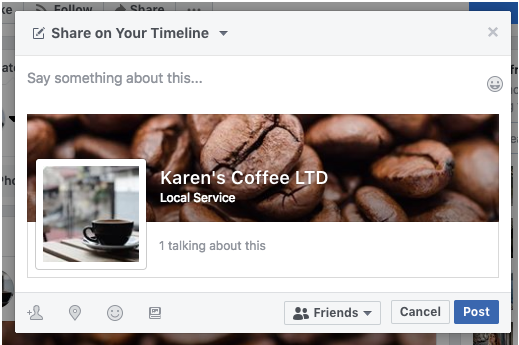
Once you create a username, it will be listed as @username. For example, @KarenscoffeeLTD is the username of our Facebook business page.

Post interesting content. People who visit your page will expect to see some valuable content, so don’t disappoint! You can add a blog post, a photo, or even an inspirational quote that you feel your audience will enjoy. (For more information regarding adding content to your Facebook business page, see our blog post on How to Create a Social Media Content Plan.)

Like your page. Use your personal Facebook account to give your page its first “like” – simply click the “Like” button under your cover photo.

Invite friends to like your page. Now that your Facebook page is all set up, you’re ready to be noticed! On the right hand side of your page, you’ll see a search bar that says “Search for friends to invite.” Type in the names of any of your Facebook friends who you think will enjoy your page and click the “Invite” button next to their names.

Share your page to your Timeline. If you want to spread the word about your business, posting your Facebook business page to your personal Timeline is an easy way to start. Click the “Share” button under your cover photo and write a caption about your new page. When you’re done, click “Post.”

Insights. Once your Facebook page is in action, it’s important to know if your audience is engaged. Luckily, your “Insights” tab provides you with the analytics that give you a sense of how well your page is performing in real time.  

To see these insights, click on the three dots underneath your cover photo (next to the “Share” button).

Then, click “View Insights,” and you’ll see a number of measures regarding your Facebook business page displayed.

From here on out – it’s your turn!

Now that your Facebook business page has been created and optimized, read all about creating an effective social media marketing strategy.

Wondering how you’re going to find the time to manage your social media page? Don’t worry – Tailor Social has you covered! Start scheduling your posts here, and we’ll do the rest.

Ready To Start?

Simply Start Your Trial Now to explore all Tailor Social features for free.